An Overview of Cardiac Arrest: Recognition and Management

Sophie Wheeler   Published 17th February 2023

On this page


The information on this page was accurate at the time of publication. Always consult current national and local guidelines. Content is for training purposes only.

Cardiac Arrest

It's important for all healthcare workers to have an understanding of how to identify a patient that is in cardiac arrest, or at risk of imminent cardiac arrest, using the A-E assessment approach. You should then be able to call for support from the cardiac arrest team and perform CPR to begin resuscitation of a patient while waiting for help to arrive.

Identifying cardiac arrest

Patients at risk of arrest

Be aware of which patients on your ward are at risk of cardiac arrest:

  • Previous cardiac arrest
  • Previous myocardial infarction
  • Electrolyte abnormalities (especially potassium!)
  • Patients with arrhythmias (e.g. AF or long QT syndrome)
  • Patients who are having seizures
  • Patients with respiratory difficulty (e.g. asthma, COPD)
  • Patients on certain medications that can trigger arrhythmias

Recognising cardiac arrest

You should be able to perform an ABCDE assessment to identify cardiac arrest. The key features you may find are:

  • Sudden loss of responsiveness
  • Abnormal, absent or slow, laboured breathing
  • Lack of a pulse
  • Seizure-like movements can occur at the start of cardiac arrest


Key Findings in Cardiac Arrest

Quickly assess patient response using the AVPU scale.

  • Alert - are they fully alert and oriented
  • Voice - do they respond when you speak to them - speak clearly and lean over to speak into both ears
  • Pain - do they respond to a painful stimulus - trapezius squeeze or sternal rub
  • Unresponsive - no response from the patient

If a patient is unresponsive, shout for help and assess if they are breathing.

Lean over the patient and place your cheek above their mouth and nose, looking down towards their chest.

  • Look - for chest rise and fall
  • Feel - for breath on your cheek
  • Listen - for breath sounds

If the patient isn't breathing, or their breathing is shallow/irregular, start chest compressions immediately. Get help by shouting or pulling the emergency alarm. Get them to call the cardiac arrest team and bring the crash trolley to you. DO NOT STOP compressions while talking to other team members.

If the patient is not breathing, you don't need to feel for the pulse before starting compressions.

Feeling the pulse is most useful during rhythm checks in the cardiac arrest algorithm, to distinguish between an arrhythmia compatible with life or a pulseless rhythm. It's preferable to feel for a strong central pulse, e.g. the carotid pulse in the neck.


Getting help

Once you've recognised a patient is in cardiac arrest (or arrest is imminent) you should start chest compressions and get urgent help.

Shout for help and pull the emergency buzzer to alert the team in the area.

When the team arrive, while performing compressions, tell them to:

  • Call 2222 and tell the operator we need the [adult/paediatric] cardiac arrest team to come to [exact location: bed, bay, ward, floor, building, hospital site]
    • For example: "Call 2222 and tell the operator we need the adult cardiac arrest team to come to bed 1, bay 2, ward 15 (AMU), level 5, Balmoral Building, Leicester Royal Infirmary"
    • It is essential to give a clear statement of who to call and exactly where you are, the person who is helping you may not be familiar with the location, may not have placed an arrest call before, or may not be clinical staff (e.g. ward admin, porter, cleaner)
  • Ask them to bring the ward crash trolley back with them once they've made the call

The cardiac arrest team

Once the 2222 call has been placed, the cardiac arrest team will respond. They are made up of:

  • Crash team leader - often the medical registrar on call, or a consultant Critical Care doctor
  • Two junior doctors - one should be at least FY2/SHO level
  • Senior Nurse Support
  • Anaesthetist - minimum level: core trainee

Airway management

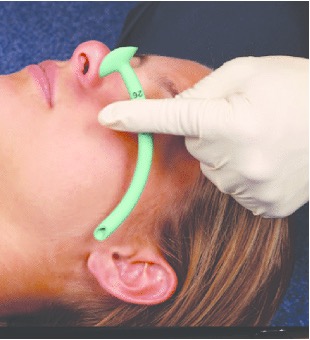
A patient in cardiac arrest is unlikely to be able to maintain their own airway. There are several methods we can use to maintain a patient's airway while waiting for senior support.


Simple airway manoeuvres

Head-Tilt Chin-Lift

  • Not an option in suspected C-spine injury
  • Beware of overextension, as this can further compromise the airway
  • If patient is breathing adequately, high flow oxygen can be applied

Head-Tilt Chin-Lift
Head-Tilt Chin-Lift

Jaw Thrust

  • Lifts the mandible forwards and lifts the tongue off the posterior pharynx
  • Used in patients requiring bag-valve mask ventilation
  • Also used in patients with C-Spine injury

Jaw Thrust
Jaw Thrust

Suction

  • Can be used to clear vomit, blood, secretions and foreign bodies from airway
  • If patient actively vomiting, turn them on their side and tilt head end of bed down
  • No blind suctioning!
  • Short, efficient burst of suctioning, focusing on areas where liquid may pool

Suction
Suction


Nasopharyngeal airways (NPAs)

Indication

  • Increased WOB/respiratory distress
  • Aim is to address any airway obstruction and free up airway practitioner
  • Helpful in patients whose mouth is difficult to open (eg: seizure)

Sizing & Insertion

  • Come in two sizes:
    • 6mm for women
    • 7mm for men
  • Lubricate the tube with gel
  • Insert into the nostril gently curved side down
  • Aim towards the occiput
  • Use a twisting motion if necessary

Notes

  • Contraindicated in suspected basal skull fracture
  • Can cause trauma to nasopharynx
NPA
NPA


Oropharyngeal airways (OPAs)

Indication

  • Increased WOB/respiratory distress
  • Aim is to address any airway obstruction and free up airway practitioner
  • Helpful in patients whose mouth is difficult to open (eg: seizure)

Sizing & Insertion

  • Sized from incisors to angle of mandible
  • Several sizes available
  • Insert OPA ‘upside down’
  • Twist 180 once inserted halfway (behind the tongue)
  • The flanged front end should sit just in front of the teeth

Notes

  • May cause vomiting or laryngospasm
  • Tolerating an OPA is an indicator of an unprotected vulnerable airway
OPA
OPA


Supraglottic Airways

Indication

  • Best option (except ETT intubation) for the patient in arrest
  • Provides some aspiration protection but does NOT fully secure the airway

Sizing & Insertion

  • Three sizes typically available
    • Green = large adult
    • Orange = medium adult
    • Yellow = small adult
  • Lubricate outer cuff
  • Stand behind patient, hold i-Gel like a pen and insert into airway
  • Push back over tongue, then backwards and downwards until it reaches back of hypopharynx
  • Inflate the cuff using air-filled syringe
  • Secure with bandage or tape
  • Can attach to bag-valve mask, or ventilator

Notes

  • Patient will not tolerate unless completely unconscious
i-Gel
i-Gel supraglottic airway

Ventilation

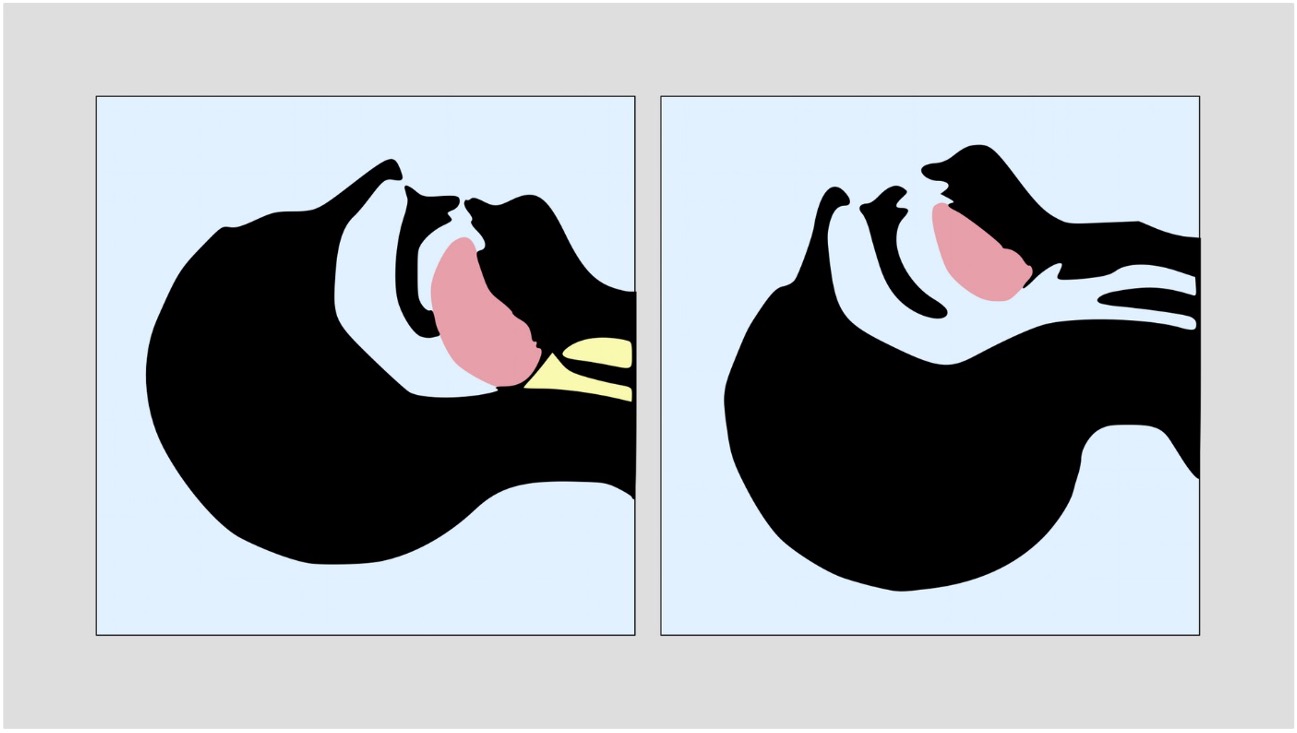
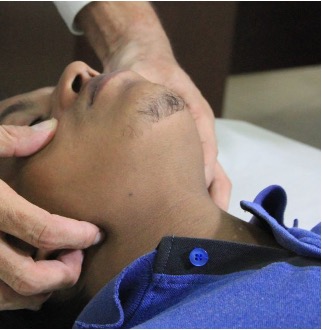
After securing any unconscious patient’s airway, you must decide whether they require passive or active ventilatory support.

  • Passive ventilation - oxygen via non-rebreathe mask - the patient can ventilate on their own
  • Active ventilaation - oxygen via bag-valve mask or ventilator - you ventilate the patient

A patient in cardiac arrest will not be breathing on their own and will need active ventilation.


Ventilating with a bag-valve mask

  • Apply the mask firmly to the patients face using your index finger and thumb in a C shape to ensure a good seal
  • Hook your other three fingers under the mandible
  • Raise your fingers to perform a jaw thrust
  • Squeeze the bag firmly with your other hand, release, pause and repeat at a rate of 10 breaths per minute (for continuous ventilation) or at a compression:ventilation ratio of 30:2
BVM Technique
One-person technique for bag-valve mask ventilation

Troubleshooting

If you have issues ventilating a patient, get senior help quickly!

In the interim:

  • Try NPAs/OPAs
  • Try a supraglottic airway

The patient may require intubation when help arrives.

Chest compressions

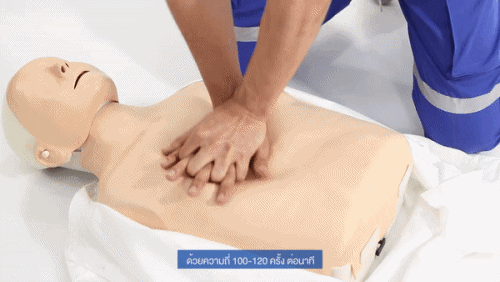
Ensure chest compressions are high-quality, this means:

  • Correct rate - 100-120 per minute
  • Correct depth - at least 1/3rd of the chest (~ 5-6cm in most adults)
  • Full recoil between compressions - come up to allow the chest wall to fully recoil each time
  • Minimise any interruptions to compressions. If you must stop compressions (e.g. for a rhythm check or specific intervention), everything must be planned and communicated to the team beforehand so the time off the chest is as minimal as possible

Compressions and ventilation

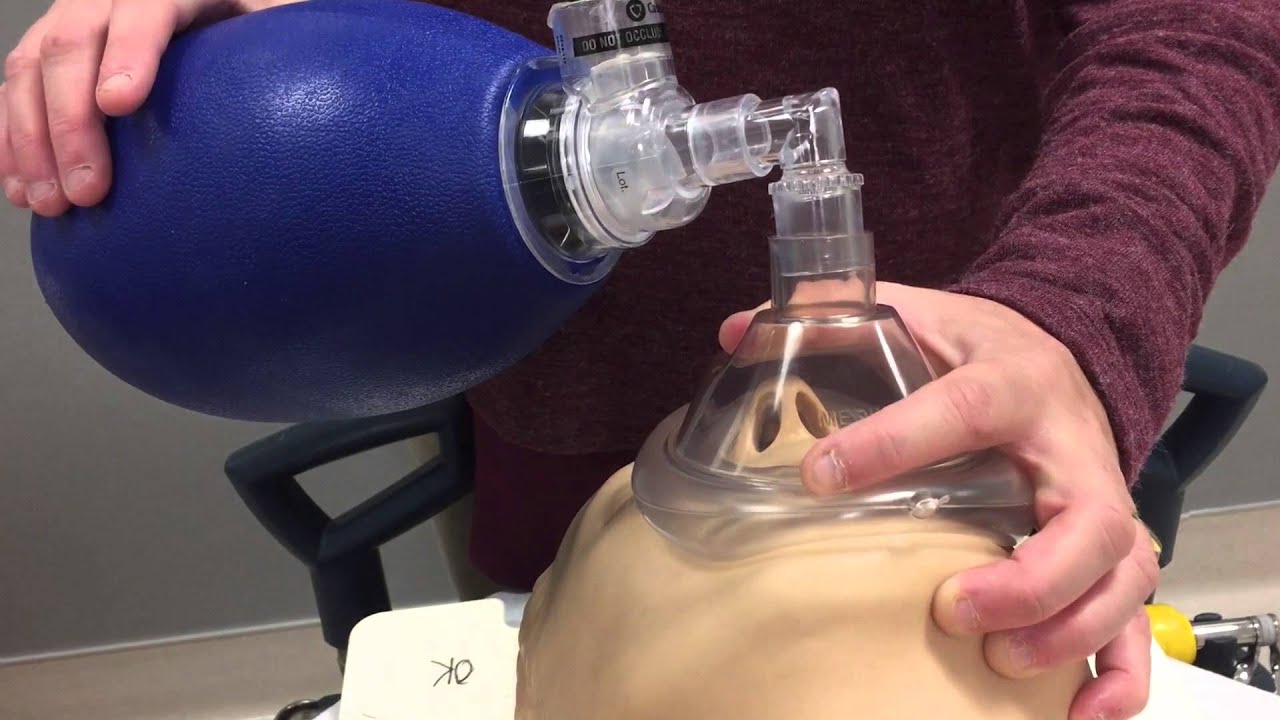
CPR should initially be performed at a ratio of 30 compressions to 2 breaths. Breaths can be delivered via a bag-valve mask, with or without adjuncts such as OPAs or NPAs.

Once a more definitive airway is in place (either a supraglottic airway or an endotracheal tube), perform continuous compressions, with continuous ventilation at ~10 breaths per minute.


Switching roles

Performing chest compressions is very tiring, so staff should rotate who is performing compressions to ensure they are always high quality. The team leader should frequently switch people in and out of performing compressions.

  • When performing CPR at 30:2 - change over as the breaths are delivered to ensure there are no additional pauses in compressions
  • When performing continuous compressions - have the person taking over stand next to you and be in position. Count compressions up to 30 then step away and the new person should immediately take over from 1, with no gap inbetween
Chest compressions
Chest compressions, performed at 100-120 bpm, compressing at least 1/3 of the chest and allowing full chest wall recoil

Rhythm analysis and defibrillation

Patient monitoring

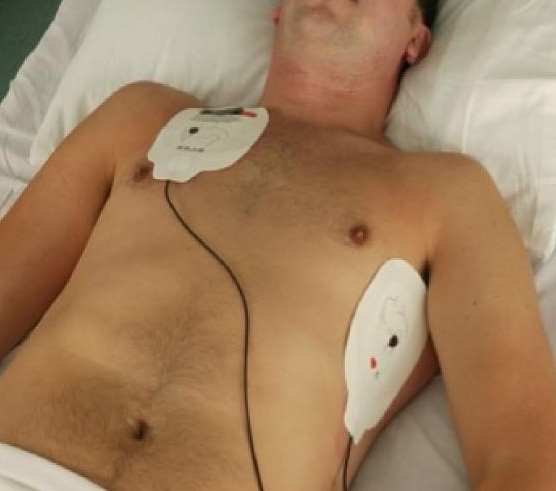
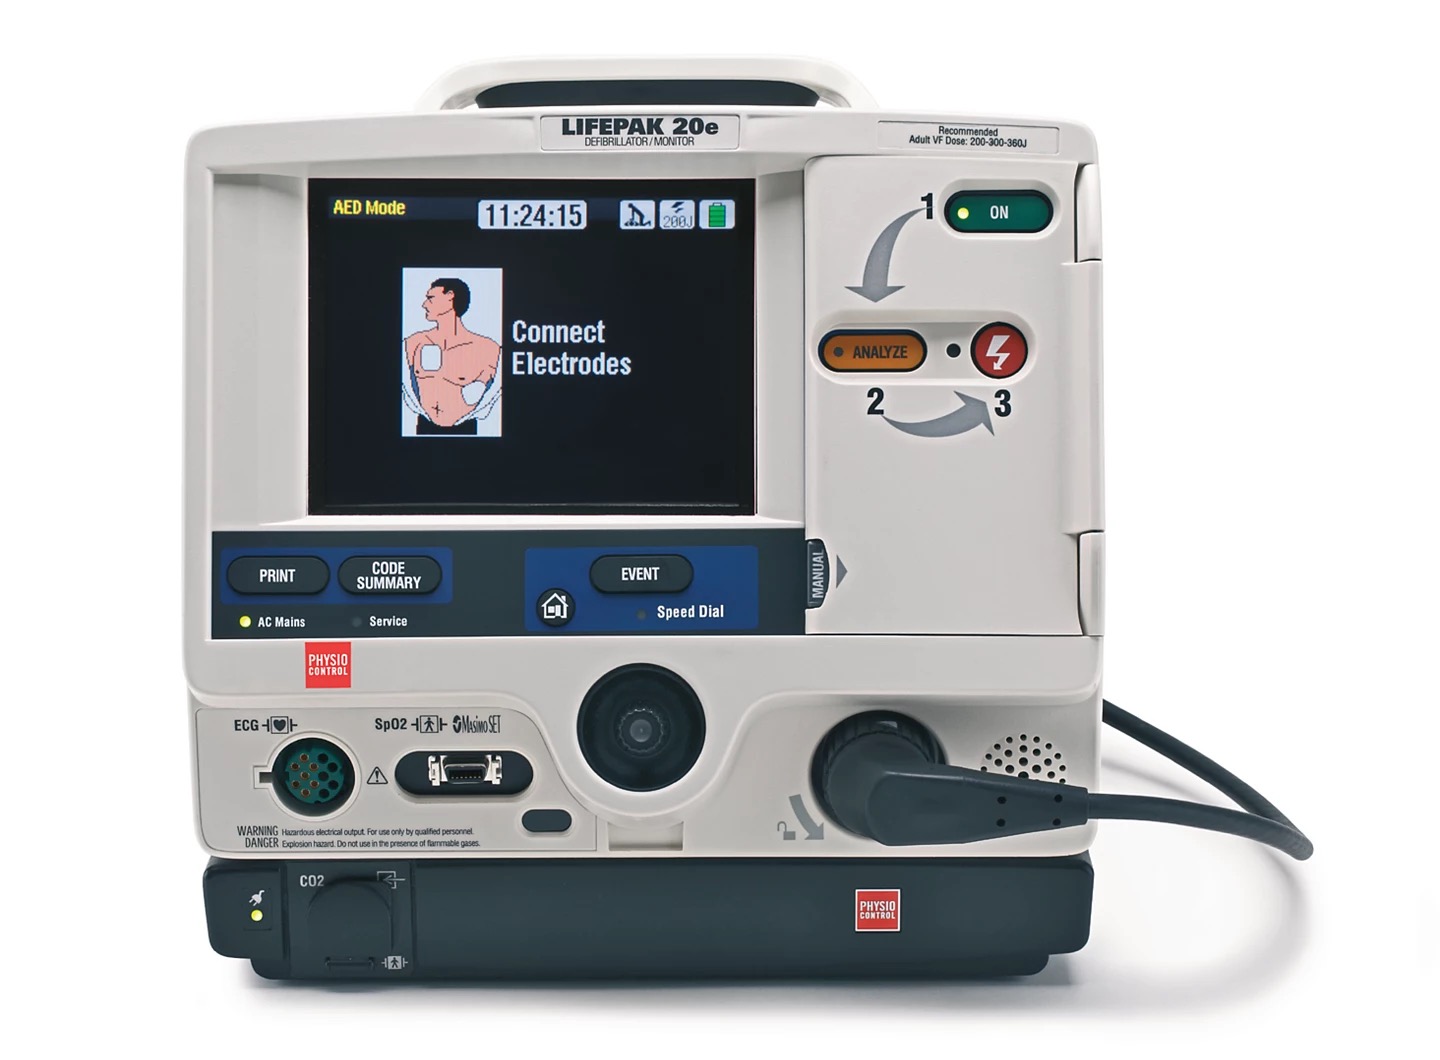
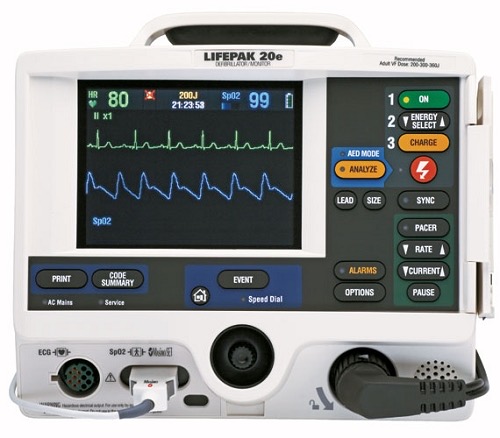
Attach the pads in order to get an ECG rhythm on the defibrillator monitor. Most devices also allow you to attach an oxygen saturation probe and blood pressure cuff. Some advanced devices may also allow for additional monitoring such as end-tidal CO2 and temperature probes.

Ensure the defibrillator pads are stuck firmly to the patient, you may need to wipe/dry the chest and shave any hair. The pads can be attached in a variety of positions:

  • Anterior-lateral - the most convenient and widely-used
  • Anterior-posterior - commonly used in children (where anterior-lateral pads would be too close together)
  • Lateral - lateral (bi-axillary) - if there is a problem with sticking a pad to the front of the chest
  • Posterior-lateral - for patients that need to stay in the prone position
Defibrillator pad position
Standard anterior-lateral defibrillator pad position

Rhythm analysis

Defibrillators in automatic mode (AED) will analyse the ECG rhythm automatically and recommend a shock if appropriate. If you use the defibrillator in manual mode, you will need to assess the ECG rhythm yourself and decide what to do.

  • Not every rhythm in cardiac arrest is shockable!
  • It's important to distinguish the shockable rhythms (VF/Pulseless VT) from the non-shockable rhythms (PEA/Asystole)
  • “Non-shockable” means the heart’s electrical pacemaking system has shut down completely, and the patient will not benefit from defibrillation
  • “Shockable” means the electrical system is still working, but is delivering signals to the heart’s chambers irregularly. In this case, defibrillation may help

Shockable rhythms

Ventricular Fibrillation (VF/V-Fib)

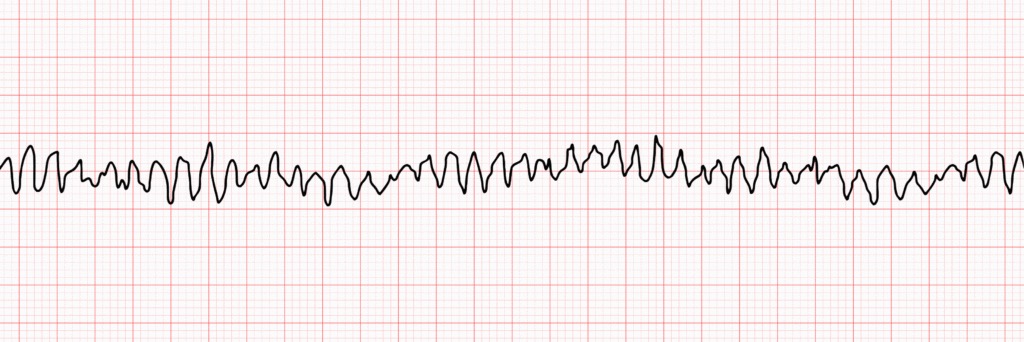
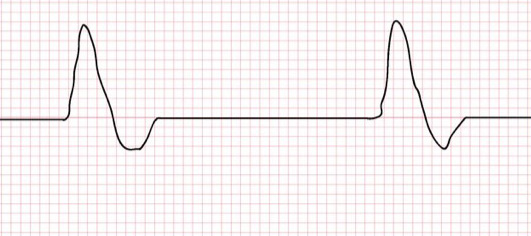
An abnormal heart rhythm in which the ventricles twitch, rather than performing proper, effective beats.

Often comes on shortly after a heart attack (MI) and is the leading cause of sudden cardiac death.


Ventricular fibrillation
Pulseless Ventricular Tachycardia (pVT/VT)

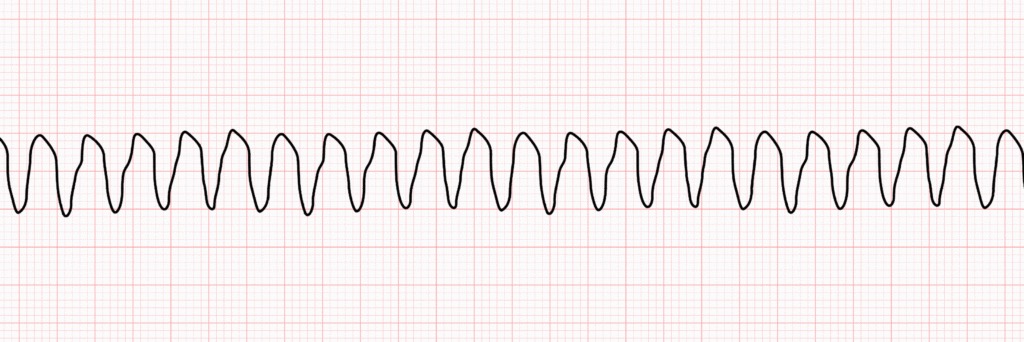
Tachycardia (>100bpm) caused by irregular electrical impulses in the ventricles.

If this rhythm is associated with no pulse, it is classified as pulseless VT and can be shocked.


Ventricular tachycardia
Pulseless ventricular tachycardia

Non-shockable rhythms

Pulseless Electrical Activity (PEA)

The heart’s electrical activity is too weak to continue pumping blood throughout the body.

The electrical system is working fine and may show a rhythm normally compatible with life - it’s just not powerful enough, therefore a shock will not help in this instance.


Pulseless electrical activity
Asystole

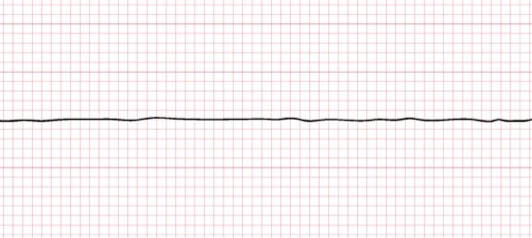
The heart’s electrical system has shut down and there is no heartbeat.

Can be the result of untreated VT or VF.

Shocking will not help, as there is no electrical activity to rectify.


Asystole
Asystole


Defibrillation

Automatic (AED)
  • Door is closed on the defibrillator
  • The device assesses the rhythm for you when you press the analyse button, and advises whether a shock is needed
  • Charges to a pre-set power (usually 200 J)
  • All you have to do is press the shock button once the device has charged
LifePak 20e monitor defibrillator in automatic mode
LifePak 20e Monitor Defibrillator in automatic mode
Manual
  • Open the door on defibrillator to activate manual mode
  • The ECG rhythm is shown on screen for you to assess
  • You are responsible for charging to an appropriate power using the energy select and charge buttons, and delivering the shock
  • Manual mode also allows for synchronised shocks and cardiac pacing
LifePak 20e monitor defibrillator in manual mode
LifePak 20e Monitor Defibrillator in manual mode

The Cardiac Arrest Algorithm

Shockable Rhythms

  1. Recognise cardiac arrest and call for help
  2. Start CPR 30:2 and attach defibrillator pads
  3. Stop CPR to assess the ECG rhythm and check for a pulse - in this case the rhythm is shockable (VF or pVT)
  4. Resume CPR
  5. Ask all members of the team except the person performing compressions to stand clear, oxygen should be disconnected and held away
  6. Charge the defibrillator to the set energy
    • The first shock should be 200 J, the next should be 300 J, then all subsequent shocks are 360 J
  7. Ask the person performing compressions to stand clear, check to ensure nobody is touching the patient directly or indirectly
  8. Deliver the shock to the patient
    • Always look at the patient while delivering a shock, not the defibrillator! You must be aware of everyone in the vicinity and only deliver the shock when safe to do so
  9. Immediately resume CPR and ventilation for 2 minutes, then go back to step 3 to perform another rhythm check
Cardiac arrest drugs in shockable rhythms
  • After the third shock, give 1mg of IV adrenaline (10ml of 1:10,000) and 300mg of IV amiodarone
  • Then give another 1mg of IV adrenaline (10ml of 1:10,000) after every other shock (i.e. shocks five, seven, nine, eleven etc)

The algorithm should be continued until the rhythm/pulse check shows return of spontaneous circulation (ROSC) or the team decide it is appropriate to discontinue resuscitation efforts.

During the whole algorithm, the team should consider if there are any reversible causes of cardiac arrest that can be treated.


Non-Shockable Rhythms

  1. Recognise cardiac arrest and call for help
  2. Start CPR 30:2 and attach defibrillator pads
  3. Stop CPR to assess the ECG rhythm and check for a pulse - in this case the rhythm is non-shockable (PEA or asystole)
  4. Resume CPR and ventilation for 2 minutes, then go back to step 3 to perform another rhythm check
Cardiac arrest drugs in non-shockable rhythms
  • After the first rhythm check, give 1mg of IV adrenaline (10ml of 1:10,000)
  • Then give another 1mg of IV adrenaline (10ml of 1:10,000) after every other shock (i.e. shocks three, five, seven, nine etc)

The algorithm should be continued until the rhythm/pulse check shows return of spontaneous circulation (ROSC) or the team decide it is appropriate to discontinue resuscitation efforts.

During the whole algorithm, the team should consider if there are any reversible causes of cardiac arrest that can be treated.

Return of spontaneous circulation (ROSC)

If you achieve a rhythm compatibile with life and the patient has a pulse:

  • Re-check the A-E assessment
    • Is the most appropriate airway adjunct in place? Do they need to be intubated?
    • Are they making efforts to breathe for themselves? If not, continue ventilation
    • Perform a 12-led ECG
    • Re-do bloods and ABG, CXR if not done already, they may need a central line
  • Identify and treat any underlying pathology
  • Notify and handover to ITU with the following information:
    • Clinical neurological findings (e.g. retention of any neurological function?)
    • Comorbidities and age
    • Type of arrest and rhythms seen
    • Downtime, delay to start of CPR, quality of CPR
    • Interpretations of any key investigations already done and those ordered


When do we decide to stop?

  • Most resuscitation attempts are unsuccessful – it is important to know when to stop
  • The decision to stop CPR should be tailored according to the specifics of the individual patient and is based on clinical judgement
  • Decision typically made by Team Leader, in consultation with the rest of the team

Key considerations

  • Was arrest observed?
  • What was the initial rhythm? Did the rhythm change?
  • Cardiac vs. non-cardiac cause? Any reversible causes identified?
  • Time to CPR?
  • Time to defibrillation? Number of shocks? Which medications given?
  • Total length of resuscitation attempt?
  • Intubated? CO2 concentrations?
  • Neurological deficits identified?
  • Circumstances surrounding arrest (including co-morbidities)